Activities Q1/3
Ongoing
Extra fun
Vocabulary
Templates
Open template, save a copy to your C drive, edit
Downloads, Tutorials
Royalty Free Images, Audio, and Video
Tips and General Help
Montage Production
Outstanding 90-100
- Video is between 45 seconds and 1 minute long
- Video has a clear subject and focus
- Video includes at least 10 visual media (images or video clips)
- Video includes a 3-second lead
- A standard resolution is used
- Resolution of visual elements fits the video resolution
- Video includes two soundtracks with one being a VO
- Audio and video are well synced
- VO and dialogue are clear
Proficient 80-90
- Video is 1-15 seconds too long or short
- Video has a clear subject and focus
- Video includes at least 8 visual media (images or video clips)
- A standard resolution is used
- Resolution of visual elements fits the video resolution
- Video includes two soundtracks with one being a VO
- Audio and video are mostly well synced
- VO and dialogue are mostly clear
Basic 70-80
- Video is 16-30 seconds too long or short
- The subject and focus are not entirely clear
- Video includes at least 6 visual media (images or video clips)
- A standard resolution is used
- Resolution of visual elements doesn't always fit the video resolution
- Video includes one soundtrack
- Audio and video are not well synced in multiple places
- VO and dialogue are often unclear
Insufficient 60-70
- Video is 31-45 seconds too long or short
- The video lacks a subject and focus
- Video includes fewer than 6 visual media files
- Resolution of visual elements doesn't always fit the video resolution
- Video includes one soundtrack or no soundtrack
- Audio and video are poorly synced
- VO and dialogue are not clear
- Submission format is not correct
To complete this activity, follow the steps below. Click on links for help.
- Print your script that you created in the last activity.
- Locate the Desktop folder you created in the last activity. You can add media to the folder now if you like.
- Create a Premiere Pro project in your Desktop folder. See how.
- In Premiere Pro, arrange your media in your timeline according to your script. See how.
- Add your VO in Premiere Pro. See how.
- Export your video to mp4 format See how.
- Upload your video to Google Drive and get a link for it. See how.
- Submit that link on Google Drive.
In this activity, you will learn how to record and edit audio with multiple tracks using different tools. You'll be using that audio in your montage video that you wrote a script for in the previous activity. You'll also be completing your first video in this class from pre-production (scripting and planning), to production (recording and gathering media), to post-production (editing).
Learning objectives: By the end of this activity, you will be able to:
- Record audio using test to speech (TTS)
- Record audio in Audacity
- Record audio in Premiere Pro
- Import an existing audio file into Premiere Pro
- Sync a VO track with video in Premiere Pro
- Edit your video with audio in Premiere Pro and export in mp4 format
Step One: Print your script
Print the script you created in the last activity.
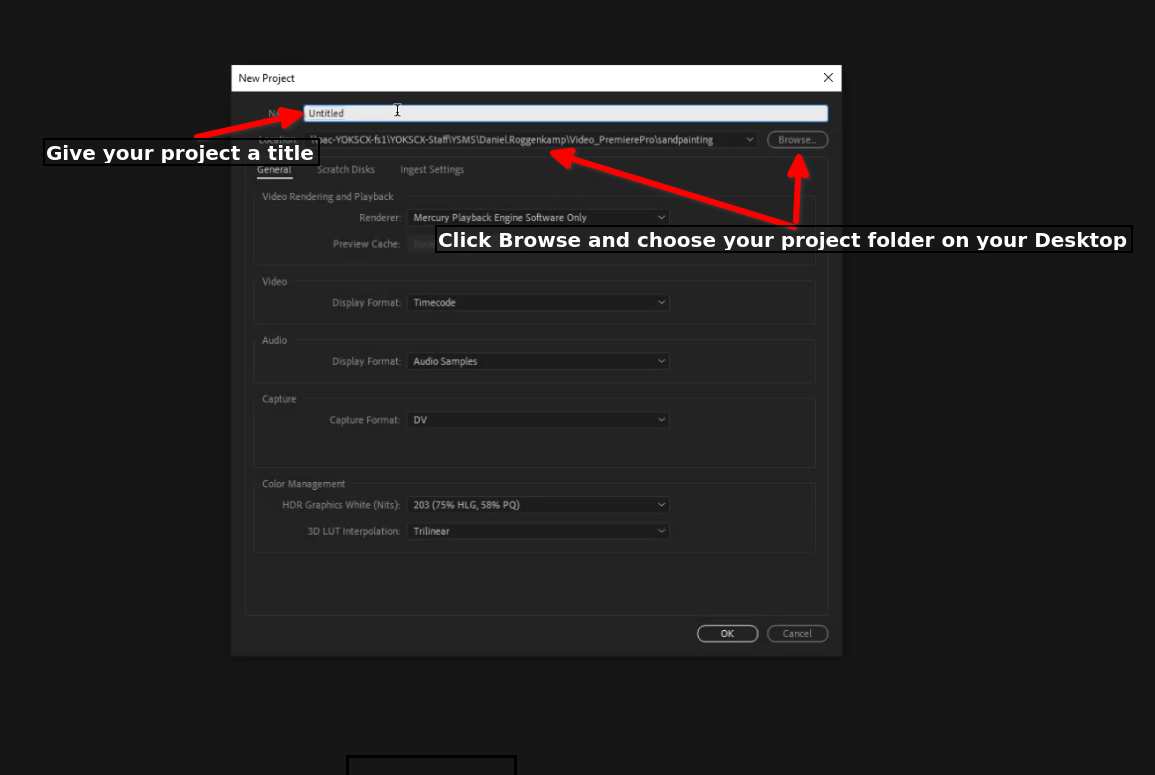
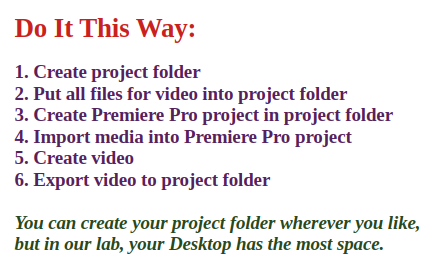
Step Two: Create your Premiere Pro project
Be sure to create your Premiere Pro project in your project folder! This folder should already have media that you downloaded in the previous activity. You can add media to that folder at any time. But sure to update your script if necessary.
From this point on, the exact sequence in which your produce your video is somewhat flexible. The instructions here are the recommended sequence.
Once your Premiere Pro project is created, import your visual media into that folder (i.e., images and video clips.) You are not required to have video clips. Remember that you need at least 10 image files.
Next, import your media into your Premiere Pro project and arrange your images in the timeline in the order indicated in your script. You can change the duration and order of images later. It's OK to not follow your script exactly when you start production. That's normal. One reason to build your timeline now is to make sure that your sequence as indicated in your script looks good and that it works visually.
Step Three: Practice recording
This is a step that you might actually do earlier. In fact, the teacher might have you practice recording before we begin this activity. Regardless, if you have never recorded audio before, now's the time.
Creating audio using text to speech (TTS)
This is probably the simplest and easiest way to create your audio.
Explore the TTS options linked on the Free Audio and Video Tools page. Once you identify your favorite tool, record your audio in segments.
Practice first!
Recording audio in Audacity
Many students will find that basic recording functions of Audacity are quite easy to learn. The best way to learn is often to just open the software and start playing around with it.
Try that now! Open Audacity, record your voice, delete your recording, and try again. You don't learn to ride a bike by reading about riding a bike. You learn to ride a bike by riding a bike!
When you do find you have a specific question, there's always the manual. Here are a few links from the Audacity manual to get you started:
Remember that when you record in Audacity, you are creating an Audacity project. You need to export your recording to mp3 in order for it to be usable in your video project.
Recording audio in Premiere Pro
Some students might find it easier to record a VO directly in Premiere Pro, and that's fine. In Premiere Pro, you can record directly on the timeline. This is fine for basic VO tasks and has the benefit of making your recording easier to sync.
As with learning Audacity, you can learn how to record on Premiere Pro by either just jumping or having a look at the manual first. Below are a couple resources to get you started.
To learn how to record a VO and edit audio in Premiere Pro, see these tutorials
Step Four: Record your VO
Now that you've played around a bit with recording audio, it's time to choose which tool to use for your video project.
You're already set up your Premiere Pro project in that folder, so if you record your audio directly on Premiere Pro, you won't have to worry about exporting your VO track.
Regardless of the tool you use, there are two general approaches to recording and syncing your VO:
- You can record your VO as you watch the video. This is the simplest way, and if all goes well, your VO will be synced as you record. But, if you later change any of the video elements, obviously you'll have to edit your VO in the audio track.
- You can record your VO separately, then import the recording and sync the audio by editing the audio track.
Step Five: Add background soundtrack
Now it's time to add some background music.
First, download some royalty free music from one of the following sources:
You may use another source as long as the music is royalty free. You must still cite your where you got the music on your credits list at the end of your video.
Once you have downloaded your music file, import it into your Premiere Pro project.
Next, drag the file on to an audio track. You will likely need to reduce the volume of this soundtrack so that it doesn't interfere with your VO. To lower the volume of an audio track, you simply click on the Audio tab at the top of Premiere Pro, then use the Audio Track Mixer tool.
Step Six: Export and submit your video
Once you have finished editing your video, you can export it to mp4 format as you learned previously, upload your video to Google Drive, get a shared link and turn that link into Google Classroom.
You're done! Congratulations!
Need a challenge?
Try any of the following:
- Add some of your own media to our shared folder! Share your media with Mr. R, and he will upload it to the shared folder.
- Help others! Keep your ears out for Ask 3 questions.
- Add a third sound track.
- Use some of the audio functions in Premiere Pro.
- Explore using the audio and video transitions in Premiere Pro.
Premiere Pro audio tutorials
Audacity tutorials