Activities Q1/3
Ongoing
Extra fun
Vocabulary
Templates
Open template, save a copy to your C drive, edit
Downloads, Tutorials
Royalty Free Images, Audio, and Video
Tips and General Help
Montage Practice
Montage 1 Rubric
Outstanding 90-100
- Video is between 45 seconds and 1 minute long
- Video includes at least 8 images
- Video includes a 3-second lead
- Video has no black screen other than what is appropriate for transitions
- The mp4 video was uploaded to Google Drive and a link submitted to Google Classroom.
- Files in your project folder are named logically.
- You continued working on and learning Premiere Pro for the entire course of the activity, even if you have completed all of above items.
Proficient 80-90
- Video is 1-15 seconds too long or short
- Video includes at least 7 images
- Video has no black screen other than what is appropriate for transitions
- The mp4 video was uploaded to Google Drive and a link submitted to Google Classroom.
Basic 70-80
- Video is 16-30 seconds too long or short
- Video includes at least 6 images
- Video has some rough edits resulting in black screen for more than three seconds
- The mp4 video was uploaded to Google Drive and a link submitted to Google Classroom.
Insufficient 60-70
- Video is 31-45 seconds too long or short
- Video includes fewer than 6 visual media files
- Video has multiple rough edits resulting in choppy video with frequent black screen
- Submission format is not correct
ISTE Standards for Students
1: Empowered Learner
Students leverage technology to take an active role in choosing, achieving, and demonstrating competency in their learning goals, informed by the learning sciences.
1a
Students articulate and set personal learning goals, develop strategies leveraging technology to achieve them and reflect on the learning process itself to improve learning outcomes.
1b
Students build networks and customize their learning environments in ways that support the learning process.
1c
Students use technology to seek feedback that informs and improves their practice and to demonstrate their learning in a variety of ways.
1d
Students understand the fundamental concepts of technology operations, demonstrate the ability to choose, use and troubleshoot current technologies and are able to transfer their knowledge to explore emerging technologies.
2: Digital Citizen
Students recognize the rights, responsibilities and opportunities of living, learning and working in an interconnected digital world, and they act and model in ways that are safe, legal and ethical.
2a
Students cultivate and manage their digital identity and reputation and are aware of the permanence of their actions in the digital world.
2b
Students engage in positive, safe, legal and ethical behavior when using technology, including social interactions online or when using networked devices.
2c
Students demonstrate an understanding of and respect for the rights and obligations of using and sharing intellectual property.
2d
Students manage their personal data to maintain digital privacy and security and are aware of data-collection technology used to track their navigation online.
3: Knowledge Constructor
Students critically curate a variety of resources using digital tools to construct knowledge, produce creative artifacts and make meaningful learning experiences for themselves and others.
3a
Students plan and employ effective research strategies to locate information and other resources for their intellectual or creative pursuits.
3b
Students evaluate the accuracy, perspective, credibility and relevance of information, media, data or other resources.
3c
Students curate information from digital resources using a variety of tools and methods to create collections of artifacts that demonstrate meaningful connections or conclusions.
3d
Students build knowledge by actively exploring real-world issues and problems, developing ideas and theories and pursuing answers and solutions.
4: Innovative Designer
Students use a variety of technologies within a design process to identify and solve problems by creating new, useful or imaginative solutions.
4a
Students know and use a deliberate design process for generating ideas, testing theories, creating innovative artifacts or solving authentic problems.
4b
Students select and use digital tools to plan and manage a design process that considers design constraints and calculated risks.
4c
Students develop, test and refine prototypes as part of a cyclical design process.
4d
Students exhibit a tolerance for ambiguity, perseverance and the capacity to work with open-ended problems.
5: Computational Thinker
Students develop and employ strategies for understanding and solving problems in ways that leverage the power of technological methods to develop and test solutions.
5a
Students formulate problem definitions suited for technology-assisted methods such as data analysis, abstract models and algorithmic thinking in exploring and finding solutions.
5b
Students collect data or identify relevant data sets, use digital tools to analyze them, and represent data in various ways to facilitate problem-solving and decision-making.
5c
Students break problems into component parts, extract key information, and develop descriptive models to understand complex systems or facilitate problem-solving.
5d
Students understand how automation works and use algorithmic thinking to develop a sequence of steps to create and test automated solutions.
6: Creative Communicator
Students communicate clearly and express themselves creatively for a variety of purposes using the platforms, tools, styles, formats and digital media appropriate to their goals.
6a
Students choose the appropriate platforms and tools for meeting the desired objectives of their creation or communication.
6b
Students create original works or responsibly repurpose or remix digital resources into new creations.
6c
Students communicate complex ideas clearly and effectively by creating or using a variety of digital objects such as visualizations, models or simulations.
6d
Students publish or present content that customizes the message and medium for their intended audiences.
7: Global Collaborator
Students use digital tools to broaden their perspectives and enrich their learning by collaborating with others and working effectively in teams locally and globally.
7a
Students use digital tools to connect with learners from a variety of backgrounds and cultures, engaging with them in ways that broaden mutual understanding and learning.
7b
Students use collaborative technologies to work with others, including peers, experts or community members, to examine issues and problems from multiple viewpoints.
7c
Students contribute constructively to project teams, assuming various roles and responsibilities to work effectively toward a common goal.
7d
Students explore local and global issues and use collaborative technologies to work with others to investigate solutions.
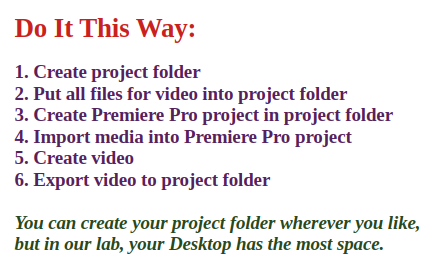
To complete this activity, follow the steps below. Click on links for help.
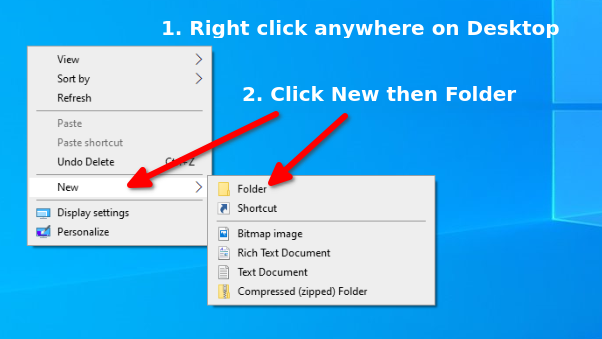
- Create a project folder on your desktop and name that folder montage_practice. See how.
- Download a prepared set of files at this link: Tokyo Bay files
Optional As an option, you can download at least eight files for your montage from any of of the following sites:- Mr. R's shared folder on Google Drive | Also available here
- GoodFreePhotos.com
- FoodiesFeed.com
- Flickr Commons - Use the search bar near the bottom of that page that says Search the Commons.
- PhotosForClass.com
- Create a Premiere Pro project in your project folder on your Desktop. See how.
- Import your pictures into your Premiere Pro project. View the video on this link named Import media.
- Arrange your media on your timeline. Please watch the video titled Build a sequence at this link.
- Export to mp4, upload to Google Drive, and share on Google Classroom. Please see export instructions under Step Five, below. Remember to use Ask 3 if you need help!
Why are we doing this?
This activity allows you to practice using Premiere Pro for the first time in this class. The learning objectives for this activity cover skills that are absolutely essential for the rest of the class.
Learning objectives
By the end of this lesson, you will be able to:
- Create a project folder on your Desktop
- Create a Premiere Pro project file in your project folder
- Download media for your video to your project folder
- Import media into your Premiere Pro project
- Arrange and edit your media in the Premiere Pro timeline
- Export your video to mp4 format
- Upload and share your video on Google Drive
Step One: Create a project folder and collect your media
Create a project folder on your computer Desktop and name that folder using good naming practices as we learned previously. I'll name mine montage_practice. You will be putting all your project files in this folder, including your Premiere Pro configuration file.
Now it's time to download images for your video.
You can download a prepared set of images and videos at this link: Tokyo Bay Images
Optional: As an option, you can download your images and videos from any of the links below. These are the same links you can find at the bottom of the main menu at left:
- Mr. R's shared folder on Google Drive | Also available here.
- GoodFreePhotos.com
- FoodiesFeed.com
- Flickr Commons - Use the search bar near the bottom of that page that says Search the Commons.
- PhotosForClass.com
You must use at least eight files. Your finished video should be between 45 seconds and 1 minute long. You can use as many files as you like.
Remember to save your files in your project folder on your Desktop! Also, when you are saving your files, rename them if necessary. If they already have a good, descriptive name, then that's fine.
If you have your own images or videos available for download that you'd rather use, that's great!
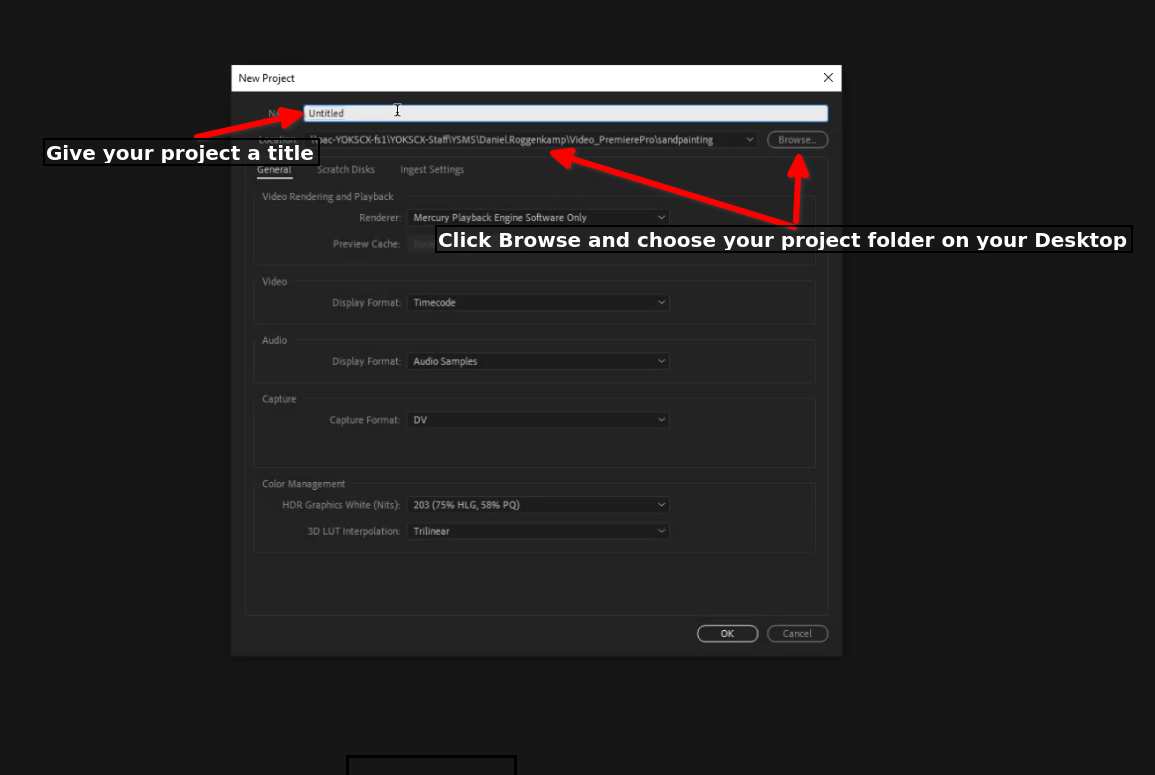
Step Two: Create a Premiere Pro project in your project folder
This step is very important! When creating your Premiere Pro project be sure to give it a descriptive title and also change the location for your project file.
See this image for instructions on how to do that.
You can also view the video at this link named Create a project. You can find this tutorial under the Learning tab at the top of your Premiere Pro.
If you created your Premiere Pro project properly, you should now see a file with a prproj extension. So if you named your project Montage1, your project file will appears in your Desktop project folder as Montage1.prproj. If you do not see it there, stop! It's very important to get this right from the start. If you can't find your prproj file, try to set up your project again. If you still can't find it, it's time to start the Ask 3 process!
Step Three: Import your media into your Premiere Pro project
View the video on this link named Import media. You can also find this tutorial under the Learning tab at the top of your Premiere Pro.
Step Four: Arrange your media on your timeline
Now that you have your media imported into your Premiere Pro project, it's time to build your sequence by dragging your media onto the timeline.
Please watch the video titled Build a sequence at this link. You can also find this tutorial under the Learning tab of your Premiere Pro.
Step Five: Export to mp4, upload to Google Drive, and share on Google Classroom
To export to mp4, complete the following steps: (Adobe, n.d.)
- Click File on the top toolbar, far left.
- Find the Export option and hover over it with your mouse.
- Select Media. This will open the Export Settings window.
- Find the Format line under Export Settings and click the drop-down menu.
- Choose H.264, which is another name for mp4.
- Click Output Name, name your file, and choose where to save the file. Save your file to your project folder on the Desktop!
- Hit the export button.
- Wait. It may take a while. Be sure to wait until it has finished exporting.
- Before you upload your file to Google Drive, find it in your project folder. It will have an mp4 extension. Open it by double clicking (left) on the file name or right clicking and choosing 'open'. Make sure it plays properly. If it does, you're good to go.
- Now upload your mp4 video to Google Drive, get a shared link, and submit that link on Google Classrom.
You're done! Congratulations!
Need a challenge?
Try any of the following:
There are lots of things you can do to supercharge this activity!
- Add more images and video clips. Use some of your own!
- Add background audio. You can download royalty free audio from Bensound.com.
- Add a voiceover! Watch Record a Voice-over to see how.
- Add video effects such as transitions.
- Play around with fast and slow motion.
- Use multiple audio tracks.
- Learn how to use the green screen.
- Help your classmates!
REFERENCES
Adobe. (n.d.). How to export Premiere Pro to mp4. https://www.adobe.com/creativecloud/video/hub/guides/how-to-export-premiere-pro-to-mp4.
HELP!
Tutorials to help you with Premiere Pro: